首先,为什么要学习自定义Editor
一个引擎自带的工具永远不能涵盖所有工程中的问题
在一个游戏项目中,开发者不仅需要开发游戏本身,还需要开发一系列工具来辅助游戏开发
就好比厨子做菜还要磨磨刀
在Godot中,开发自定义界面是容易很多的
界面开发流程上跟开发游戏UI流程差不多
本篇采用Godot-mono4.4,也就是用C#开发自定义界面
一步一步,实现一个简单的Markdown查看器
为啥实现一个Markdown查看器呢,因为这个足够简单
而且能把开发Editor中的大部分逻辑都过一遍
<0x01> 新建一个插件
在Godot中,我们需要在插件中实现自定义界面
在项目 >> 项目设置 >> 插件中选择创建新插件
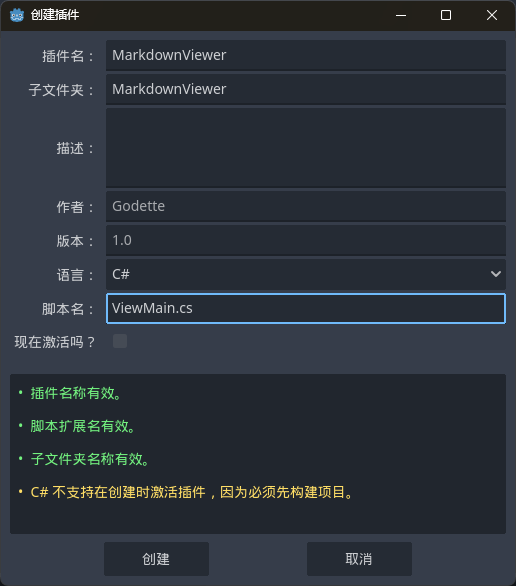
需要注意的是,这里的信息最好后面就别改了
可能是由于C#的编译问题,如果后面改了会导致无法启用插件
并且由于C#是编译型的语言,每次测试插件都需要编译项目后重新启用
然后Godot就会生成插件需要的文件,里面包含这样的一个C#脚本
// ViewMain.cs
#if TOOLS
using Godot;
using System;

[Tool]
public partial class ViewMain : EditorPlugin
{
	public override void _EnterTree()
	{
		// Initialization of the plugin goes here.
	}

	public override void _ExitTree()
	{
		// Clean-up of the plugin goes here.
	}
}
#endif
其中,[Tool]表示这个脚本可以在编辑器中运行_EnterTree()表示启用插件时的逻辑,_ExitTree()表示禁用插件时的逻辑
<0x02> 在场景中编辑界面
Godot的自定义界面需要自己定义一个场景,开发逻辑跟游戏中界面一样
首先创建一个用户界面场景,也就是以Control节点为根节点的场景
保存到插件的目录下,这里保存在res://addons/MarkdownViewer/window.tscn
然后在代码中添加实例化界面的代码
// MainView.cs
#if TOOLS
using Godot;
using System;

[Tool]
public partial class ViewMain : EditorPlugin
{
    private Control _dock;
    // 让别的脚本可以访问到根场景节点
    public static Control RootNode;

    public override void _EnterTree()
    {
        _dock = GD.Load<PackedScene>("res://addons/MarkdownViewer/window.tscn").Instantiate<Control>();
        AddControlToDock(DockSlot.RightBl, _dock);
        RootNode = _dock;
    }

    public override void _ExitTree()
    {
        RemoveControlFromDocks(_dock);
        _dock.Free();
    }
}
#endif
如果有接触过其他的前端开发框架,那应该是挺好理解Godot的控件开发的
在编辑器中编辑这个场景,加入一些需要的控件
(为了方便起见节点名也是类型名)
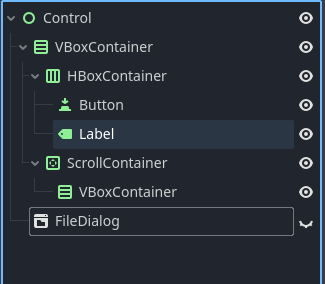
Control/VBoxContainer/HBoxContainer/Button这个按钮是用来选择文件的Control/VBoxContainer/HBoxContainer/Lable这个是用来显示当前选择文件的Control/VBoxContainer/ScrollContainer这个是显示Markdown内容的视图Control/FileDialog是用来做选择文件交互的窗口,也是一个自带的控件
给控件添加脚本
给控件添加脚本跟开发游戏中界面类似,但要注意加上[Tool]
前面也讲到,这个特性表示这个脚本可以运行在编辑器里
比如说这里给选择文件的按钮加上脚本
实现点击选择文件的功能
选择Button节点,右键,添加脚本,给脚本起个名字
这里叫FileButton,里面代码如下
// FileButton.cs
using Godot;
using System;

[Tool]
public partial class FileButton : Button
{
    public override void _Ready()
    {
        ButtonDown += () => ViewMain.RootNode.GetNode<FileDialog>("FileDialog").Show();
    }
}
修改完脚本后,记得保存场景
因为用的是C#,所以每次测试插件都要重新构建并重新启用
按同样的方法,给FileDialog添加一个脚本,做选择文件后的回调
// MarkdownDialog.cs
using System;

[Tool]
public partial class MarkdownDialog : FileDialog
{
    public override void _Ready()
    {
        FileSelected += (s) => ViewMain
            .RootNode
            .GetNode<Label>("VBoxContainer/HBoxContainer/Label")
            .Text = s;
    }
}
<0x03> 完成简单的解析逻辑
这里主要就是演示,所以解析逻辑非常简单
只做基本的文字和图片的解析逻辑
这里用一个类型表示Markdown的内容
创建一个新的C#脚本,代码如下
//MarkdownElement.cs
using Godot;

public abstract class MarkdownElement
{
    protected string OriginCode { get; set; }
    public abstract Control GetControl();
}

public class TextElement : MarkdownElement
{
    public string Text { get; set; }

    public override Control GetControl()
    {
        return new Label { Text = Text };
    }
}

public class ImageElement : MarkdownElement
{
    public string ImagePath { get; set; }

    public override Control GetControl()
    {
        var image = Image.LoadFromFile(ImagePath);
        return new TextureRect()
        {
            Texture = ImageTexture.CreateFromImage(image),
            ExpandMode = TextureRect.ExpandModeEnum.IgnoreSize,
            StretchMode = TextureRect.StretchModeEnum.KeepAspect,
            CustomMinimumSize = new Vector2(0f, 200f),
        };
    }
}
还需要一个新的工具类,负责解析Markdown文档内容
代码如下
//MarkdownObject.cs
using System.Collections.Generic;
using System.IO;
using System.Text.RegularExpressions;
using Godot;

public class MarkdownObject
{
    public List<MarkdownElement> elements = [];
    private string _filePath;

    private const string ImagePattern = @"\((.*?)\)";

    public void GenerateElements(string filePath)
    {
        var localPath = ProjectSettings.GlobalizePath(filePath);
        _filePath = localPath;
        elements.Clear();
        foreach (var line in File.ReadLines(localPath))
        {
            MarkdownElement element;
            if (line.StartsWith('!'))
            {
                string path = Regex.Match(line, ImagePattern).Groups[1].Value;
                element = new ImageElement()
                {
                    ImagePath = $"res://{path}",
                };
            }
            else
            {
                element = new TextElement
                {
                    Text = line
                };
            }

            elements.Add(element);
        }
    }
}
在运行时添加控件
在Godot中,只需要在运行时动态添加节点即可
这里就写在文件选择事件里面
// MarkdownDialog.cs
using System;

[Tool]
public partial class MarkdownDialog : FileDialog
{
    public override void _Ready()
    {
        FileSelected += (s) => ViewMain
            .RootNode
            .GetNode<Label>("VBoxContainer/HBoxContainer/Label")
            .Text = s;
	    FileSelected += (s) =>
	    {
	        var vbox = ViewMain.RootNode.GetNode<VBoxContainer>("VBoxContainer/ScrollContainer/VBoxContainer");
	        foreach (Node child in vbox.GetChildren())
	        {
	            vbox.RemoveChild(child);
	            child.QueueFree();
	        }

	        MarkdownObject obj = new MarkdownObject();
	        obj.GenerateElements(s);

	        foreach (var element in obj.elements)
	        {
	            vbox.AddChild(element.GetControl());
	        }
	    };
	}
}
创建一个简单的Markdown文档,然后在插件窗口中选择这个文档
正常情况下得到的显示是这样的
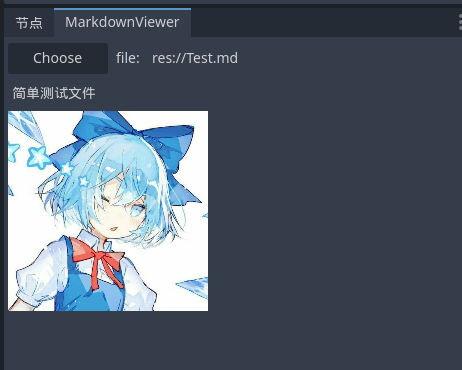
到目前为止,我们已经实现了简单的Markdown查看器
虽然比较简陋,但也算简单带过插件开发了